100 Discovery Way, Unit 110, Acton, MA 01720 US.
Mon-Fri, 8:00 AM - 5:00 PM (GMT-5)
SmartView Instructions
Quick Links
- Enabling SmartView at the SmartPAC PRO or SmartPAC 2
- Basic SmartView Setup
- Email (Messaging) Setup (SmartPAC 2 only)
- Info Center Setup (SmartPAC 2 only)
- Setting up SmartPAC 2 Backup and Restore (SmartPAC 2 only)
Overview
SmartView is a desktop application that provides access to press status information on your networked SmartPAC PRO and SmartPAC 2 controls, and provides a place to make certain feature settings on your networked Wintriss SmartPACs. SmartView also allows you to send a brief (150 character) message that will appear on the SmartPAC's screen.
SmartView's main screen shows the status of the entire pressroom. For each press, the SmartView main screen shows:
- Press Name
- Status (Running or Stopped)
- Speed (in SPM)
- Percent of Job Complete
- Estimated Time Until Job Completion
- Parts Count Preset
- Parts Count
From the SmartView main screen, you can access a Detail screen for each press. In addition to the information listed above, each press's Detail screen shows:
- Currently Running Tool Number
- Tool Name
- Press Capacity (if SmartPAC 2 is equipped with a tonnage monitor)
- Current tonnage (if SmartPAC 2 is equipped with a tonnage monitor)
- Tonnage as a % of Press Capacity (if equipped w/tonnage monitor)
- Sensor Status (if equipped w/Die Protection)
- Error Log Page
- Installed Options List
At the bottom of each detail screen, there's a form field where you can create a short text message that will be sent to the SmartPAC 2 and displayed on the screen.
The Detail screen has tabs that allow you to view the SmartPAC 2's Error Log and Installed Options. The Error Log is a time and date-stamped list of the last 100 error and events that occurred at the SmartPAC 2. The Installed Options is a table that list all of the options installed in the SmartPAC 2 along with the firmware and software versions.
SmartView captures a "snapshot" of the pressroom. The information can be refreshed manually by clicking on the "Refresh" button near the top of the screen, or SmartView can be set to automatically refresh the information every 15 seconds to 15 minutes by selecting a Refresh Rate from the pull down menu next to the Refresh button.
What You Will Need Before You Start
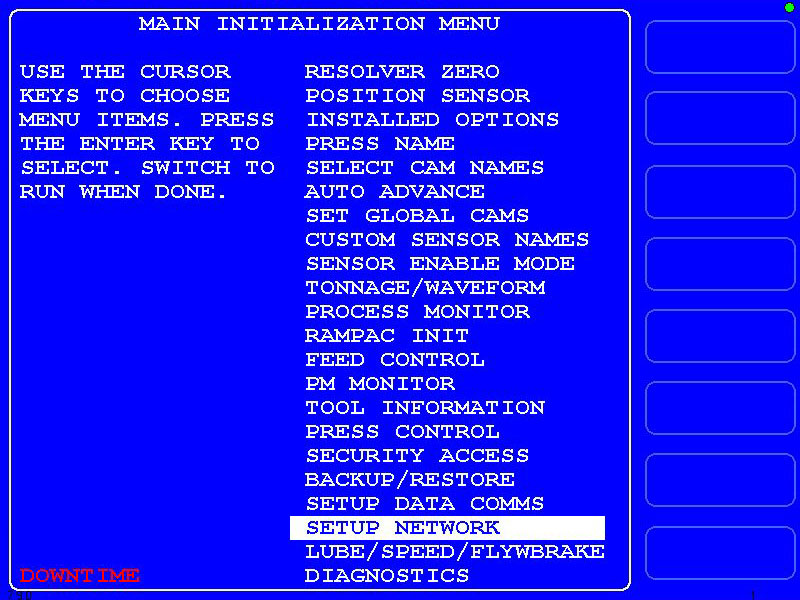
Before you begin setting up SmartView, you will need to enable SmartView in each SmartPAC PRO or 2, and then record the network names for each of the SmartPAC controls that are installed on the network.
To enable SmartView, select "SETUP NETWORK" from the Initialization menu. (The screenshots below show the SmartPAC 2, but the SmartPAC PRO settings are virtually identical).
Use the cursor keys to select "SMARTVIEW FUNCTION" and press the enter key to enable it. The selection toggles between "Enabled" and "Disabled" when the enter key is pressed.
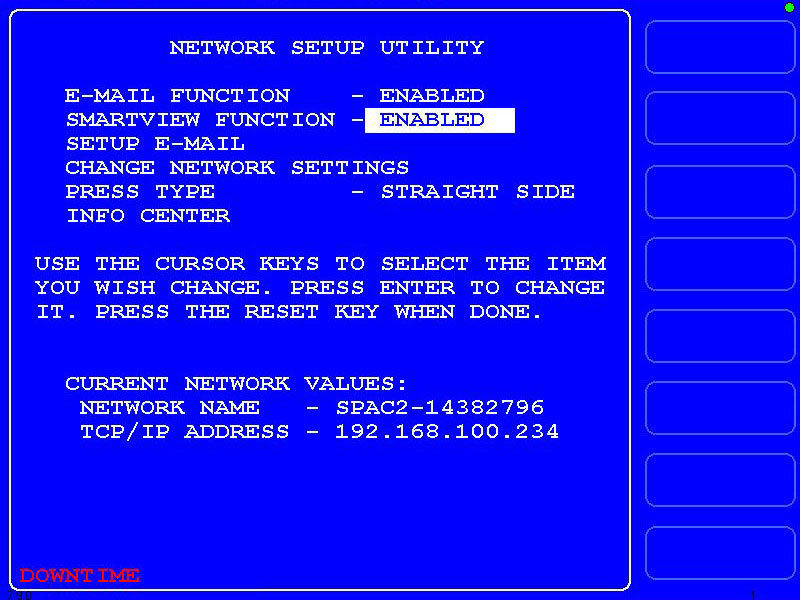
While you're on the NETWORK SETUP UTILITY screen, you should also enable the email capability by scrolling up to EMAIL FUNCTION and pressing the enter key to enable it.
The SmartPAC 2's network name is shown under CURRENT NETWORK VALUES near the bottom of the screen. You will need to enter one or both of these values when you're setting up SmartView, so make note of this information for each SmartPAC PRO or 2 that will be used with SmartView. In addition to the network name, the screen will show the IP address.In some network installations, the SmartPACs will be set up with fixed IP addresses (this is according to customer preference - you should check with your network administrator to determine if the SmartPACs in your plant use fixed IP addresses or DHCP). If your SmartPAC uses a fixed IP address, you should record the IP address on the NETWORK SETUP UTILITY screen because you will be required to enter it in the "Network Address" field on the SmartView Setup page. If not, you will enter the network name in this field.
Once you know the network names, you can browse your network to verify that each SmartPAC 2 is accessible. Note that you will not be able to get in to any directories on a SmartPAC 2 as these are password protected; just the fact that you can see a control on the network verifies that it is connected.
SmartView - Basic Setup Instructions
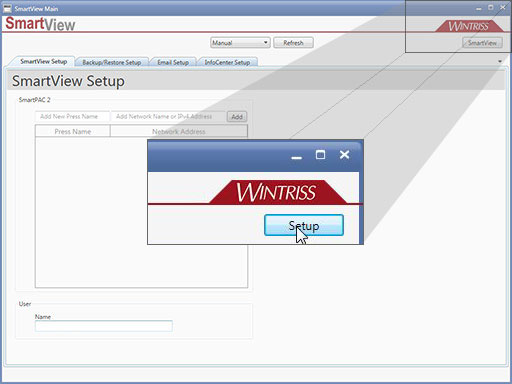
- Go to the Start Menu and open SmartView (If the icon is not visible, go to All Programs > Wintriss > SmartView).
- If this is your first time opening SmartView, you will start on a blank setup screen.
If not, click on the "Setup" button in the top right corner of the screen.
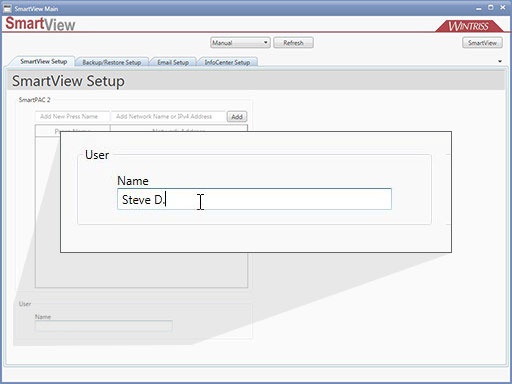
- To start using SmartView, first enter your user name. Your user name will identify you as the sender whenever you
transmit a remote message to a SmartPAC. :
- Next, you may begin adding your SmartPAC 2's.
- If you wish to change a previously entered value, simply highlight it in the list and retype the entry
- When you are finished, close then restart SmartView.

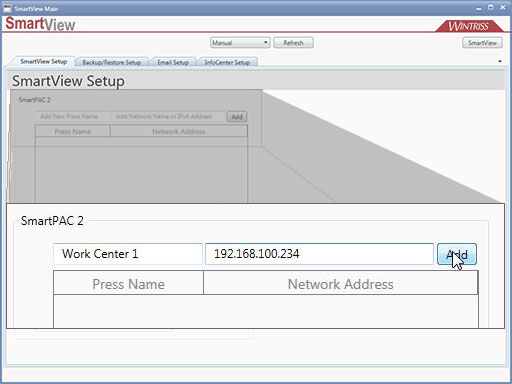
Enter the machine's name in the field labeled "Add New Press Name". Please note that the only time this name will be displayed in SmartView is if the machine is offline (such as when there is no network connection or the power to the SmartPAC is off). If the SmartPAC is online, the machine name will the one that was set in the SmartPAC's initialization menu.
If your SmartPACs are using DHCP, enter the network name in the field labeled "Add Network Name or IPv4 Address".
The network name is usually in the format:
SPAC2-XXXXXXXX with XXXXXXXX being the SmartPAC 2's serial number.
If your SmartPACs use static IP addresses, you will enter the IP address into this field. The IP address is displayed on SmartPAC 2's NETWORK SETUP UTILITY page as described above.
When you're done, click the "Add" button. Repeat this procedure for the rest of your SmartPACs.
SmartPAC 2 Only - Email Messaging Setup
The SmartPAC 2 "Messaging" feature allows the press operator to use SmartPAC 2 to send pre-formatted text messages to any email address. In addition, the Messaging feature allows you to send important information from the SmartPAC 2 such as the error log and installed options to the Wintriss Tech support group.
Please note, you must first establish communications with each SmartPAC 2 before you can start setting up the messaging feature. See the SmartView Setup instructions above.
To use the Messaging feature, you must create a list of recipients and messages that will appear on the screen of each SmartPAC 2. When a SmartPAC 2 leaves the Wintriss factory, it has one recipient - Wintriss Tech Support - hard-coded into its memory. There are two messages - "Last Error Message" and "Error Log Files" also hard-coded into memory. In addition to these, you may add as many recipients and pre-formatted messages as you like by following the instructions below.
Adding Recipients
- Open SmartView
- Click the "Setup" button in the top right corner of the window
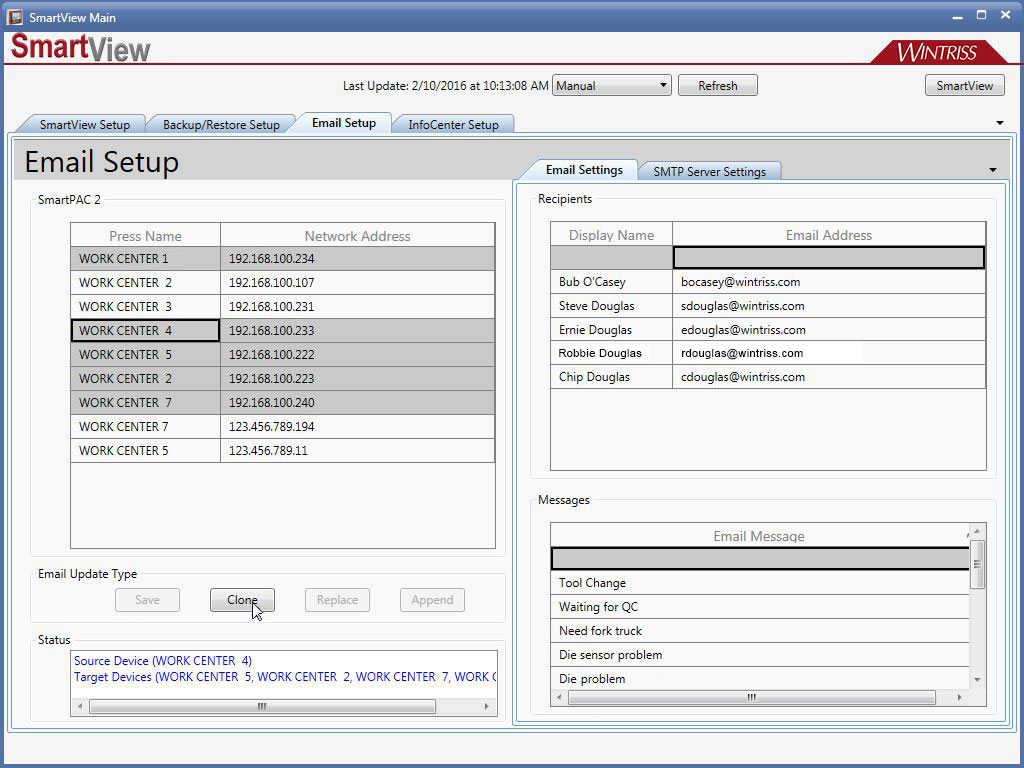
- Select the "Email Setup" tab from the row of tabs near the top of the screen.
- The table on the left lists all of the presses connected to SmartView. Click on the name of the first press you want to set up. The right side of the screen will be populated with the existing Recipients and Messages (if any).
- To add a new recipient, first double-click the grey "Display Name" field and enter the familiar name of the recipient.
- Next, double click the "Email Address" field and enter the email address for the recipient.
- Press the Enter key when you're done. The new recipient will be added to the list.
- Continue to add recipients until you're finished. Double-click any existing field if you need to edit or delete a recipient.
- Click the "Save" button on the left side of the screen to save the information to the selected SmartPAC 2. The SmartPAC must be connected to the network and powered up in order for the data to be saved. The status display in the lower left corner of the window will indicate whether or not the save was successful.
Adding Messages
- Open SmartView
- Click the "Setup" button in the top right corner of the window
- Select the "Email Setup" tab from the row of tabs near the top of the screen.
- The table on the left lists all of the presses connected to SmartView. Click on the name of the first press you want to set up. The right side of the screen will be populated with the existing Recipients and Messages (if any).
- To add a new message, double-click the grey "Email Message" field and enter the message text. The message can contain up to 1000 characters, however only the first 48 will be displayed on the SmartPAC 2's screen for the operator to see.
- Press the Enter key when you're done. The new message will be added to the list.
- Continue to add messages until you're finished. Double-click any existing field if you need to edit or delete a message.
- Click the "Save" button on the left side of the screen to save the information to the selected SmartPAC 2. The SmartPAC must be connected to the network and powered up in order for the data to be saved. The status display in the lower left corner of the window will indicate whether or not the save was successful.
Copying Settings From One SmartPAC 2 to Another
Once you've created the setting for one SmartPAC 2, they can be "cloned" and copied to other presses.
- Open SmartView
- Click the "Setup" button in the top right corner of the window
- Select the "Email Setup" tab from the row of tabs near the top of the screen.
- The table on the left lists all of the presses connected to SmartView. Click on the name of the press that you want to copy from. This will show up as the "Source" in the status box in the lower left corner of the window.
- Hold down the CRTL key and click the SmartPAC(s) you want to copy to. These will show up in the Status Box as the "Target" machines,
- Click the "Clone" button. The Recipients and Messages will be copied from the "SOURCE" machine into all of the "TARGET" machines.
- The results of the Clone function will be shown in the Status Box in the lower left corner of the window. Please note that both the SOURCE and all TARGET machines must be powered up and connected to the network. Any TARGET machines not powered up/connected will not receive the information from the SOURCE.
SmartPAC - Info Center Overview
Please Note: The Info Center is an optional feature for the SmartPAC PRO and SmartPAC 2. Info Center setup for the SmartPAC PRO is done at the
control itself. These instructions describe how to set up the Info Center for SmartPAC 2 controls..
To determine if your SmartPAC 2 is equipped with this feature, go the SmartPAC 2's
Initialization menu (Turn the PROG/RUN keyswitch to PROG and press the "1" and "Clear" keys simultaneously) and select "INSTALLED OPTIONS". If Info Center is listed,
it can be configured using the instructions below. If not, contact the Wintriss factory for information on how to upgrade your SmartPAC 2.
The following instructions describe how to use SmartPAC 2's built-in function key-based Info Center file navigation system.
For instructions on how to configure Info Center to use other navigation methods, please contact the Wintriss Factory at 800-586-8324.
Info Center Documents
The SmartPAC 2 uses a modified version of Microsoft Internet Explorer to display Info Center documents. The document types that can be displayed by the Info Center include documents with the following file extensions:
- .htm (or .html)
- .asp
- .php
- .txt
- .bmp
- .jpg (or .jpeg) (less than 500KB file size)
- .tif (or .tiff)
- .gif
- .png
The maximum size for any Info Center document is 500K.
Setting Up the Info Center
Select a Network Location (Base Path)
Create a shared folder on a server or network drive that is accessible to the SmartPAC 2. This shared folder will
become the main repository for the SmartPAC 2's Info Center documents - all of the Info Center documents must be contained
somewhere within this directory. The URL (or path) to this directory will be the "Base Path" that the SmartPAC will use
as its top level to access the Info Center documents.
Please note that more than one SmartPAC 2 can share the same "Base Path" directory - in fact, this is usually the case, because inside this directory, you will create a series of subdirectories (folders) for each tool number programmed in the SmartPACs. Since most of the Info Center documents are going to be tool-specific rather than press-specific, the main Info Center directory will feature a subdirectory for each tool number in your inventory, any of which can be accessed by any SmartPAC 2 that can run the tool.
Create the Directory Structure Inside the Base Path Location
- Open the Base Path directory, right click and select "New" and "Folder". Change the name of the new folder to Common.
- Create another new folder in the Base Path Directory and change its name to match one of the tool numbers programmed in your SmartPAC 2. Repeat this process until you've created a directory for each tool number.
-
The figure above shows a Base path directory (named "Info Center") and the directory structure for a SmartPAC 2
with three tool numbers. With the directory structure in place, you can begin to place the documents you wish to display
into each tool's corresponding directory. If there are documents you wish to display for all tools, you may place these into the
"Common" directory. The figure below shows four sample documents placed into the folder for Tool 1101.
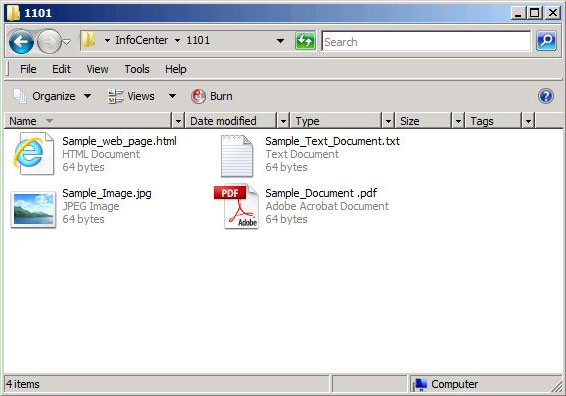
Sample Info Center Documents - Repeat this process for each tool number.
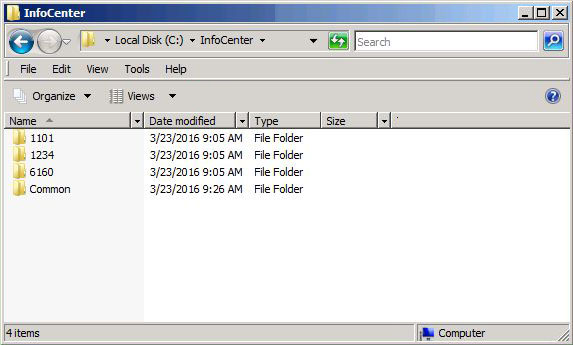
Info Center Directory Structure for a SmartPAC 2 with three Tool Numbers
Pointing the SmartPAC 2 to the Base Path
With your directory structure in place and your Info Center Documents deployed, the only thing left to is to tell each SmartPAC 2 where to look for its documents.
You will use SmartView to point the SmartPAC to the Base Path directory; and the SmartPAC 2's built-in function key navigation will do the rest.
- Open SmartView
- Verify that the SmartPAC 2 that you wish to set up is currently online. It must stay powdered up and connected to the network throughout the setup procedure, until the Base Path has been stored.
- Click the "Setup" button in the top right corner of the window.
- Click the Info Center Setup tab.
- Click on the "Path Maker" tab.
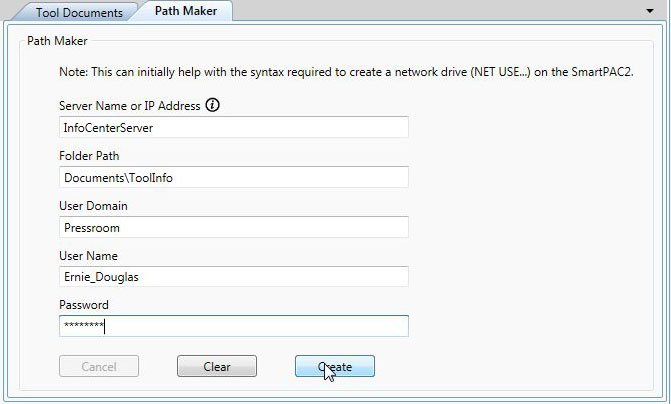
The Info Center Pathmaker - Enter the server name, the document path (which is typically a shared directory on the server, in our example we're using a shared folder named "Info Center"), and the domain login (if needed).
- Click the "Create" button and the correct path to the Info Center documents will be created.
Testing the Info Center Path and Saving it In the SmartPAC 2
To verify that the path is valid, click the "Test Server Target" button. If the server target is valid,
click the "Update SmartPAC" button to store the path in the SmartPAC 2.
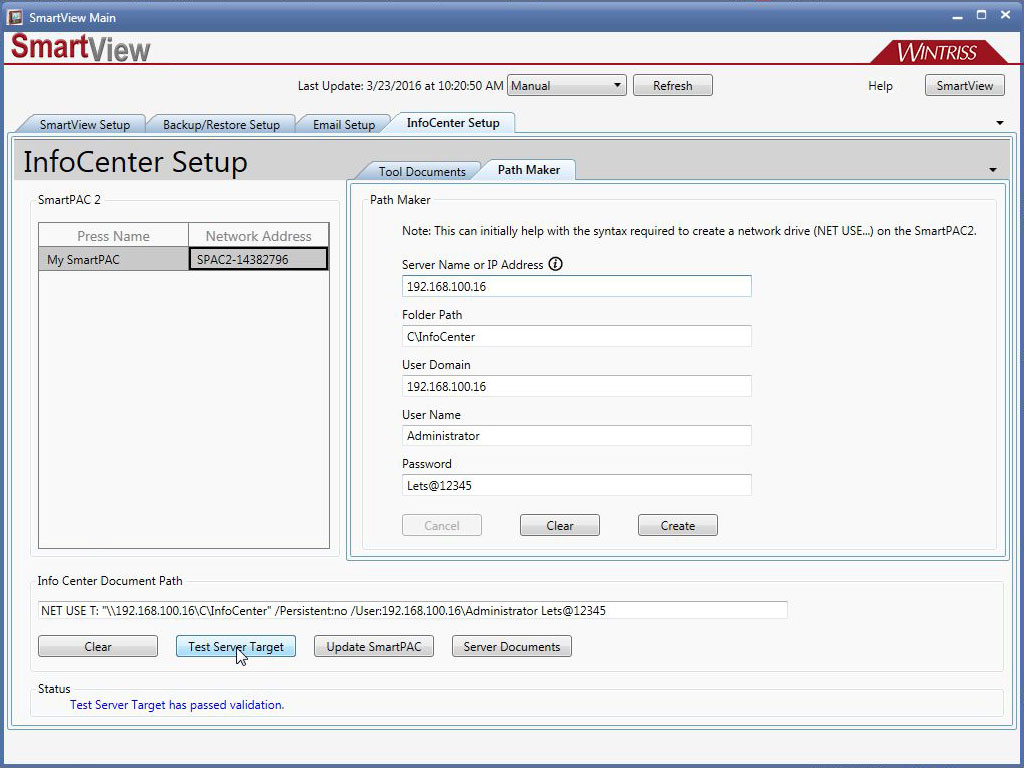
Testing the server target and saving the base path to the SmartPAC 2
If the server target comes back as Invalid, check the server name and the folder path, verify that the folder is properly shared, and that the login credentials are correct.
Testing the Info Center Path and Saving it In the SmartPAC 2
To verify that the path is valid, click the "Test Server Target" button. If the server target is valid,
click the "Update SmartPAC" button to store the path in the SmartPAC 2.
Testing the server target and saving the base path to the SmartPAC 2
If the server target comes back as Invalid, check the server name and the folder path, verify that the folder is properly shared, and that the login credentials are correct.
Using SmartPAC 2's Built-In navigation
SmartPAC 2's built-in Info Center navigation uses the Base Path directory, along with the directory structure described above, to display - on the SmartPAC 2's screen - a list of the Info Center documents assigned to each tool. Each document is displayed next to one of SmartPAC 2's function keys; and the SmartPAC 2 will open the corresponding document when the function key is pressed.
If you're setting up Info Center for the first time, the SmartPAC 2 should already be configured to use the built-in function key-based navigation. To verify:
- Open SmartView
- Click the "Setup" button in the top right corner of the window.
- Click the Info Center Setup tab.
- Click on the "Tool Documents" tab.
- In the table on the left, click on the press/SmartPAC 2 that you want to check (In the figure below, we've selected "Press 1".
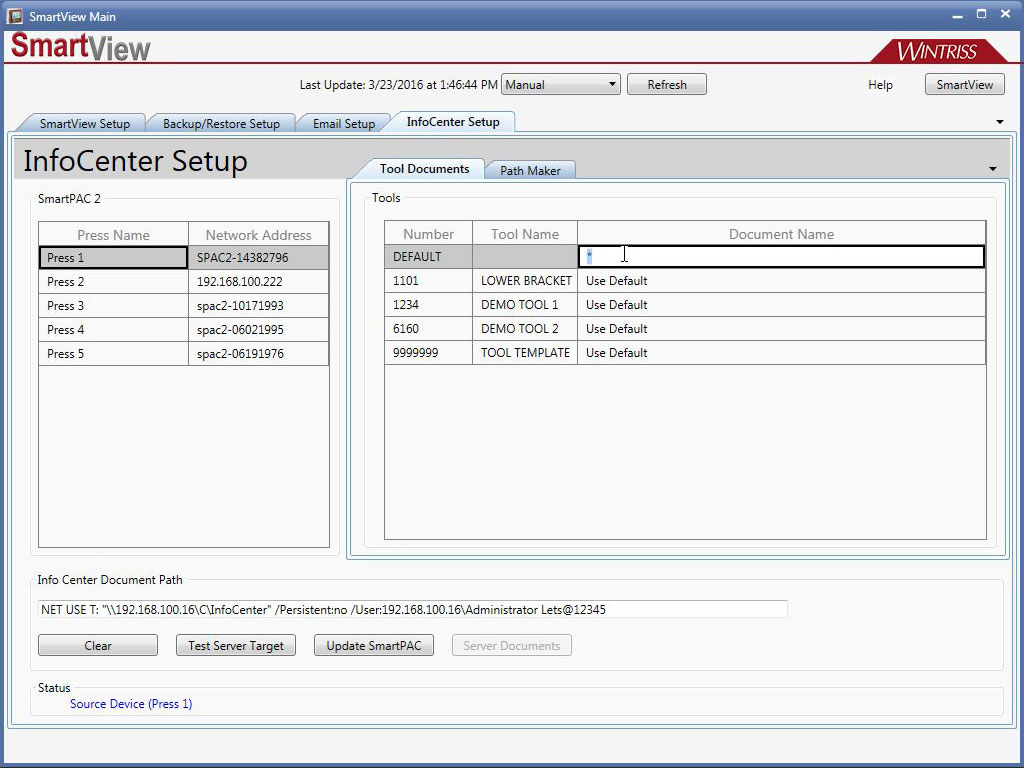
The Info Center Tool Documents - SmartView will retrieve a list of all of the tools programmed for the selected SmartPAC, and list them in the table on the right side of the window under the Tool Documents tab.
- The top row in table has the word "DEFAULT" in the column labeled "Number". It should also have an asterisk (*) symbol in the column labeled "Document Name". The asterisk indicates to the SmartPAC 2 that it should use the built-in navigation method. If there is NOT an asterisk (*) present in the "Document" field of the top row, double-click the table cell to edit it, type * and hit Enter.
- All of the actual tool numbers listed in the table will have "Use Default" in the Document Name field.
Testing the Info Center
Test the info Center at the SmartPAC 2:
- Turn the SmartPAC 2 key switch to "Program"
- Go to the Initialization menu by pressing the "1" and "Clear" keys simultaneously.
- Use the cursor keys to scroll to "SETUP NETWORK" and press "Enter".
- Scroll to "INFO CENTER" and press "Enter" to open the Info Center Utility
The Info Center Utility allows you to test-view the Info Center documents for all of your tools without having to load each tool individually. When the SmartPAC 2 is using the default navigation, The Info Center Utility will show an asterisk (*) in the top row next to the DEFAULT selection, and the word "Empty" next to each of the tools (see the diagram below).
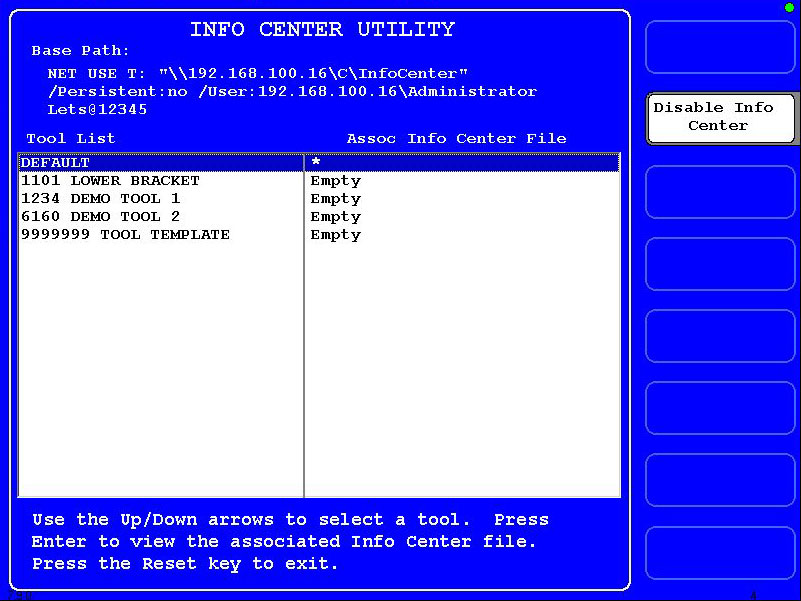
The Info Center Utility - This SmartPAC 2 is configured to use the function key-based Info Center navigation - Press the RESET key twice to return to the main Initialization menu,then turn the keyswitch to "Run" and select "INFO CENTER".
- The Info Center will display a list of available Info Center documents for the currently loaded tool, and associate each document with a function key.
When the function key is pressed, the SmartPAC 2 will display the linked document.
With 8 function keys, the SmartPAC 2 displays the first 8 documents (sorted alphabetically) in the directory. If the directory contains more than 8 documents, they can be accessed by using the SmartPAC 2's cursor keys.
The SmartPAC 2 screen shot below shows the Info Center screen for Tool Number 1101. It shows the four sample documents that were placed into the "1101" folder under the base path, as well as an additional document named "Common.txt".
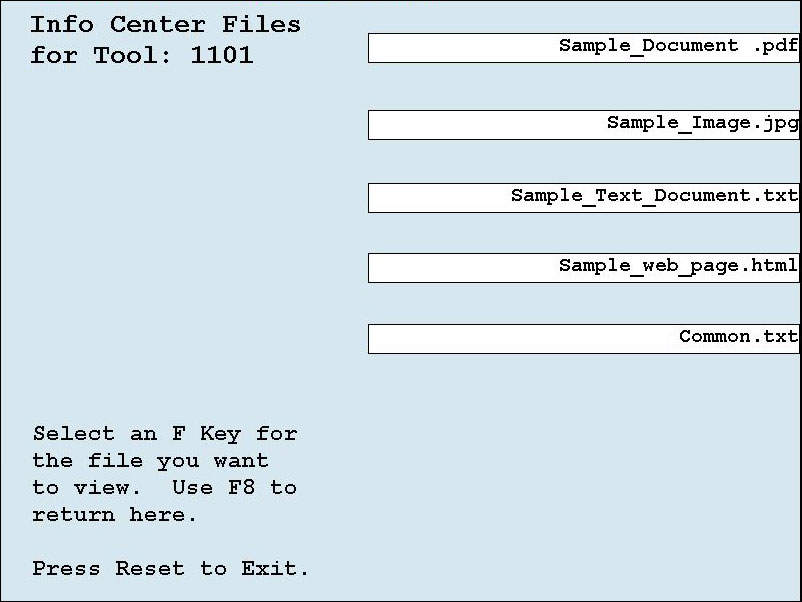
The Info Center Screen for Tool Number 1101
The "Common.txt" document shows up because it was placed in the directory named "Common" under the base path. Any document(s) placed in the Common directory will be displayed on the Info Center screen for every tool in the SmartPAC 2. Info Center places the common files on the first available function key(s) after the tool-specific documents.
Other Navigation Methods
Other more advanced navigation schemes are possible. Please contact the Wintriss Factory for more details.
FAQs and Troubleshooting
My SmartPAC 2 has no menu choice for Info Center, instead it has "Tool Information". What's wrong?
The Info Center option is probably not installed in this SmartPAC 2. To check, go to select "Installed Options" from the SmartPAC 2 initialization menu. If Info Center is not listed, then the SmartPAC 2 does not have the option. Call 1-800-586-3284 for information on how to order it.
I can't display Info Center documents on my SmartPAC 2, what should I check?
At the SmartPAC 2, go to initialization and check the following:- Under "Installed Options", verify that the Info Center is installed.
- Under "Setup Network" verify that the SmartView Function is enabled.
- Under "Setup Network"/"Info Center" verify that the Remote Path matches the location of your Info Center documents on the network.
At your computer check the following:
- Open SmartView.
- Go to setup
- Click on the Info Center tab
- in the table on the left, click on the SmartPAC 2 in question.
- When SmartView retrieves the Base path, click the "Test Server Target" button to ensure that the Base Path exists
- Ensure that the Base path directory has sharing enabled.
Can I get the Info Center option for my SmartPAC 1?
No. The SmartPAC 1 has insufficient screen resolution and lacks network compatibility. Contact the Wintriss Factory (1-800-586-8324) for information on how to upgrade to SmartPAC 2.
SmartPAC 2 - Backup and Restore Setup
The SmartPAC 2 Backup/Restore is a feature built in to the SmartPAC 2 that allows you to store a copy of the SmartPAC 2's setup memory, including all tool numbers and the initialization info, in a location on your network. This 'image" of the SmartPAC's memory can be re-installed onto the SmartPAC 2 if the need arises.
Please Note: These instructions cover Backup and Restore setup on the SmartPAC 2. The Backup/Restore feature in the SmartPAC PRO is configured at the control.
This feature is included in SmartPAC 2 firmware versions 4.59 and higher. If your firmware is older (has a lower version number), contact the Wintriss factory for instructions on how to upgrade your SmartPAC 2's firmware.
These instructions describe how to use SmartView to prepare the Backup/Restore feature for use - specifically, how to use SmartView to specify the network destination for the SmartPAC's backup files.- Open SmartView
- Verify that the SmartPAC 2 that you wish to set up is currently online. It must stay powdered up and connected to the network throughout the setup procedure, until the backup path has been stored.
- Click the "Setup" button in the top right corner of the window.
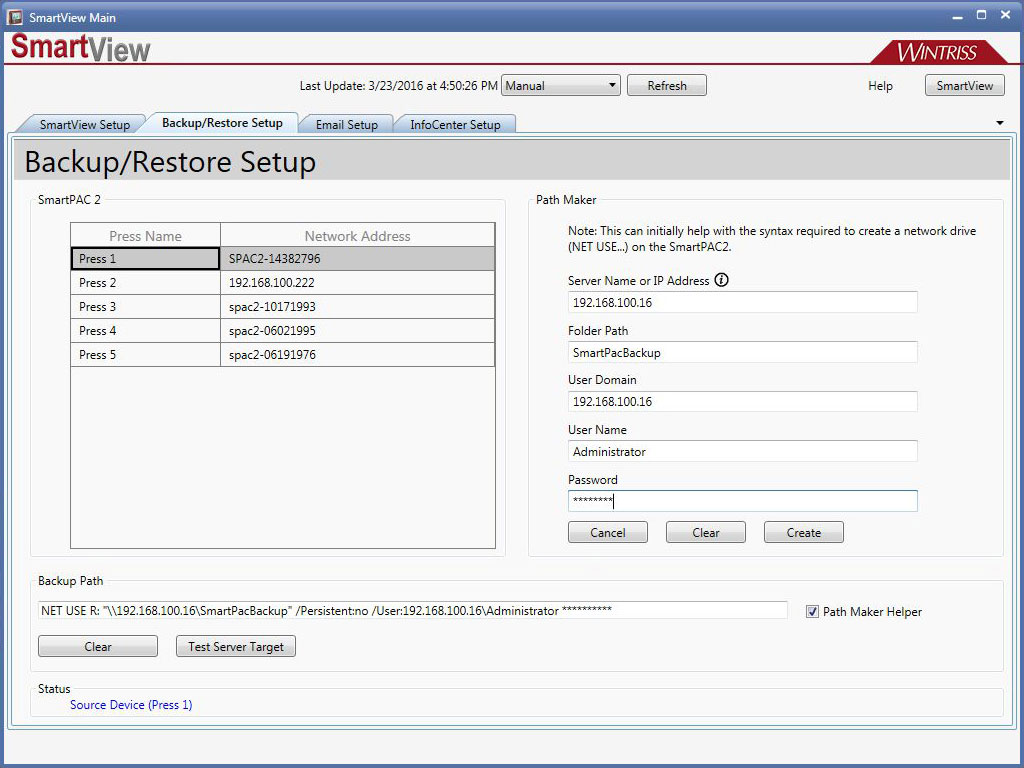
- Click the tab labeled "Backup/Restore Setup".
- Check the box labeled "Path Maker Helper" (located in the lower right corner of the SmartView Window). The Path Maker form will appear.
- Click on the appropriate SmartPAC 2 in the table on the left side of the SmartView Window
- In the path Maker form, enter the server name, the document path (which is typically a shared directory on the server, in our example we're using a shared folder named "SmartPacBackup"), and the domain login (if needed).
- Click the "Create" button and the path to the folder that will contain the backup documents will be created, and sent down to the SmartPAC 2.
- Click the "Test Server Target" button to verify that the path to the backup location is valid.
- Refer to the SmartPAC 2 User Manual for instructions on using the SmartPAC's Backup/Restore feature.
SmartView - Setup window showing the backup path maker
© Copyright 2021 Wintriss Controls Group LLC - All Rights Reserved